December 30, 2009

A Blanket for Teddy

Here's a nice, quick pattern for a small blanket for your favorite teddy bear or doll. It works up quickly and can be ready for gift-giving in no time flat.


You will need:
*  straight knitting needles size 8
*  small amount of knitting yarn - I used Wool-Ease in the color "Fisherman"

Cast on 54 stitches.

Pattern set #1 is as follows:
row 1: (knit 6, purl 6) until there are 6 stitches remaining. Knit those 6 stitches.
row 2: (purl 6, knit 6) until there are 6 stitches remaining. Purl those 6 stitches.
Repeat those two rows three more times, for a total of 8 rows.

Pattern set #2 is as follows:
row 1: (purl 6, knit 6) until there are 6 stitches remaining. Purl those 6 stitches.
row 2: (knit 6, purl 6) until there are 6 stitches remaining. Knit those 6 stitches.
Repeat those two rows three more times, for a total of 8 rows.

Then go back to Pattern set #1, and repeat these two sets over and over until your blanket is as long as you like. I did four repeats of the two pattern sets, plus one additional repeat of Pattern set #1 so that my blanket was square.

These two pattern sets together give you rows of squares, rather like a quilt.


Block to size when you are finished.

My teddy's quilt is 10 1/4" inches square. If you'd like a larger or smaller blanket, simply change the number of stitches cast on. As long as you cast on a multiple of 12 stitches plus 6, the pattern will work.  (For example, 12 stitches x 4 = 48, plus 6 gives you the 54 stitches I worked this blanket on.) You could make it narrower and longer for a lovely scarf!


December 23, 2009

A Quick Bath Set Gift

Christmas is two days away as I write this, and if you are like me, you always wish you had just ONE more gift to give someone on your list. Here's an inexpensive idea that you can do quickly and easily at the last minute. And these are great not just for Christmas, but whenever you have saved enough of those mesh bags that fruit comes in and want to make something useful from them.

Here's all you'll need:
* Mesh produce bags. I used a total of six for this gift set. Some mesh bags are softer than others. I'm using the softer kind so that it will feel good and not too scratchy on skin.
* A crocheted cotton chain loop about 12" long for the bath pouf handle. Make a second one if you want soap-on-a-rope.
* A bar of soap. I make my own soap, but I like the minty green color of this bar, so I'm going to use it for this project. Although if you have access to some nice handcrafted soaps, that would make the gift even more special!
* Strong sewing thread.
* An optional soap dish.


To make a soap sack for the bar of soap, simply wrap a mesh bag tightly around the bar of soap, and tie it in a knot at the top. (This is why you want to be sure to use the softer kind of mesh bag!) If you wanted soap-on-a-rope, tie the crocheted loop into the knot. Trim the ends of the mesh bag close to the knot. Now your soap will gently exfoliate as you use it!


Now, to make the bath pouf, make sure your mesh bags are the same length, trimming if necessary. Mine were eleven or twelve inches long. Fold these remaining five mesh bags in half, with the cut ends overlapping slightly in the center.


Stack all five folded bags together. Using strong sewing thread, tie the bundle of folded mesh bags and the crocheted loop very tightly together. Take a few stitches through the center for added security if you like.


Fluff the loops of the pouf, being careful not to pull them out of the thread in the center.


Add an optional dollar store soap dish, and you have a lovely gift in a matter of minutes!

December 22, 2009

Fruity Breakfast Cookies


While looking online for something completely unrelated, I found a recipe on WalMart's website that looked like it had potential as a breakfast-worthy treat. I tweaked it according to the ingredients I had on hand, and my, those cookies turned out delish!

Fruity Breakfast Cookies
3/4 cup softened (not melted) butter
2/3 cup granulated sugar
1 egg
1 cup all-purpose flour
1/2 teaspoon cinnamon
1/4 teaspoon ground ginger
1/4 teaspoon nutmeg
1 cup old-fashioned long-cooking oats
1 1/2 cups dried fruits (I used a mixture of cherries, cranberries and blueberries)
2 ripe bananas, sliced
1 cup pecans

Preheat oven to 375 degrees.

In electric mixer bowl, cream butter and sugar on low speed. Beat in egg. Beat in flour and spices. Now using a spoon, stir in oats, dried fruits, banana and pecans until thoroughly combined, but not so much that you smush your bananas.

Drop by rounded tablespoons onto a parchment paper-lined cookie sheet. Bake for 10 minutes or until lightly browned around the edges. They'll still look a little pale on top. Let cool briefly on cookie sheet and then transfer to a wire rack to finish cooling.

Makes about 3 dozen small cookies. You can also use a scoop and make larger cookies, but increase the baking time accordingly.

We ate most of ours as soon as they were baked, but we did save a few for eating with some eggnog ice cream. YUM!

December 15, 2009

Candied Orange Slices are totally worth the wait!

The interwebs are a dangerous place for my waistline, indeed. I've discovered that my new life here in The Great White North seems to have brought me closer to the cyber world than I ever imagined I'd be, and hunting up new recipes has been part of the hours I've spent in front of my monitor. The profound love for potluck dinners in this neck of the woods (sometimes three a month! And that's just the ones I go to!) keeps me scrambling for new treats to bring along.

And I found this recipe for The Best Candied Orange Slices In The World over at Brownie Points.


So pretty with the light shining through them.


I made 5 navel oranges' worth of slices in one and a half recipes of the sugar syrup. By the time the three-week candying process was complete, it was evident I should have made more. We were eating them before they were even finished, so once they had dried and were dipped in chocolate, the love story could only continue. They weren't done in time for the last potluck of the year (phew!) so I thought I'd give them to friends for Christmas.


And I did package up a few for friends, but only a few. We ate most of them, as you might guess. Son tried an undipped slice on a piece of toast and said it tasted like marmalade. Now I'm seeing the potential as a very fancy backpacking food. Or maybe that's just an excuse to make more!


December 10, 2009

The Eddie Bauer sweater refashion, part 3

As you can see, there isn't much left of our nice gray sweater after having made it into a hat and a scarf already. I'm determined not to let any of it go to waste, though, and there are still the two sleeves left! Happily for us, these sleeves are rather roomy, and they will make nice warm mittens for Son's man-sized hands.


The first thing I had Son do was put the sleeve on his hand and determine how far down his wrist he wanted the sleeve ribbing to be. The sleeve ribbing would become the wrist ribbing on the mittens. He positioned his hand on a piece of paper with the edge of the paper at the place where he wanted the ribbing to end on his wrist. Then he traced around his hand:


I added a half inch all the way around his outline for comfort, and another half inch for a seam allowance (one inch total all the way around), giving myself a new outline to use as a pattern:


Notice that the pattern doesn't have a distinct thumb piece. That's okay, I'll be cutting on the pencil line between the thumb and hand. You can click the photo to see it larger if you can't see the pencil line. Once the seam has been sewn, I will clip that area right down to the seam to give the thumb separation. I also intend to use the folded top edge of the sleeve - the part opposite the underarm seam - as the outside edge of the mitten. That's why there is no seam allowance or ease added to that side. I cut out the pattern and pinned it to the sleeve, matching the pattern's wrist edge with the sleeve's wrist edge, and the fold line of the pattern with the folded edge of the fabric. Then I cut out the fabric.


Turn the fabric right sides together, and pin it.


I used a three-step zigzag to sew the seam, in order to give it some stretch. Sew the seam and trim the seam allowances, being careful not to cut into your stitches!


Turn the mitten right side out and try it on!


It's a good fit, so go outside and make some snowballs!


See also: The Eddie Bauer Sweater Refashion, Part 1 and
  The Eddie Bauer Sweater Refashion, Part 2.

December 5, 2009

No-Pattern, Oddball Fingerless Mitts

Isn't this pretty yarn? BestFriend gave it to me quite a while ago, in a bag of random yarn balls she got someplace. There's no ball band, so I have no idea what brand it is, or what the fiber content is. I just know it appeals to me and that there isn't very much of it, meaning I need to choose a project carefully when it comes time to work it up.


Well, that day is now. During the winter, my hands get cold when I'm typing at my computer, and I decided (after a particularly chilly day) that I wanted some fingerless mitts to help stave off the discomfort of cold hands on the keyboard. I'm going to make up my own "pattern" for my mitts, and here's how I made them so you can make it up as you go along, too.

Without the ball band, I don't know this particular yarn's recommended needle size, but it looks like a worsted weight and the other worsteds I have recommend a size 7 if not an 8. When knitting mittens or gloves, you want a tight fabric to keep out the cold air, so you should go down a size or two in needles to ensure the stitches are without gaps. I'm using a pair of 5s.

First, I determined how long I wanted my mitts to be. I'm going to knit on two needles, and from side to side rather than top to bottom. Using a long-tail cast-on, I cast on 40 stitches, and with the stitches spread out a bit (not too tight or too loose on the needle, approximating the size of the stitches if they were already knit up) held it up to my hand and wrist to see if I was happy with the length. At this point, I can add stitches if it needs to be longer or take them off if it needs to be shorter, but I think I got it right the first time. When you're making your mitts, you may want them longer or shorter, so adjust accordingly.


To get a ribbed effect on the top and bottom of the mitts, while keeping the hand portion smooth to show off the variegation in the yarn, here is what I did:

Cast on 40 stitches using the long-tail cast-on method.
Row 1:  Knit across
Row 2:  Knit 5 (this is finger ribbing), purl 25, knit 10 (this is the wrist ribbing).
Repeat rows 1 and 2 until you can wrap the knitting comfortably all the way around your hand. For me, that was 57 rows. For you, it might be more or less.
Bind off.
Now fit the mitt to your hand by trying it on and pinning it on either side of your thumb to mark where the side seams will be and where the thumb opening is. Yes, I'm using bobby pins. For some reason I can't find my safety pins, and the bobby pins worked out great. For me, I needed to seam up 9 stitches at the top where my fingers are, and 19 stitches for my wrist, leaving the other 12 stitches open for my thumb. Your mitts might be different depending on how many stitches you started out with and where you wanted your thumb opening to be. Just try it on and figure out what you like, and it's all good. Now make a second one just like it. They're reversible so don't worry about which is the left-hand mitt and which is the right-hand mitt.


Here they are, all finished! My oh-so-pretty oddball yarn is now a cozy pair of oh-so-soft fingerless mitts.


Surely you've got some odd yarn in your stash that could be lovely, cozy mitts for you and your loved ones, right? Go get started!

November 29, 2009

The Eddie Bauer sweater refashion, part 2

It's time to revisit the remains of the thrift store sweater that was first used to became Son's earflap hat. There's really not that much left, just the tummy part and the two sleeves, but I can get a lot more good out of that old sweater! This time around, I'll be making a keyhole scarf out of the tummy part. (Yes, I took the photo upside down. Sorry.)


Why a keyhole scarf? The main reason is that it doesn't take as much fabric to make one of those as opposed to a long scarf that has to be wrapped around the neck and still be long enough for the weight of the ends to hold the scarf in place. A keyhole scarf has a slit cut in it (the keyhole) that the other end of the scarf is passed through, which keeps the scarf in place snugly against the wearer's neck without a lot of extra length.

I forgot to take a picture of the scarf when I trimmed off the little bit of excess sweater, but I just cut on the dotted line Son drew in for me. That trimmed off the ribbing around the waist, and gave me a piece of fabric about 6" wide. Son asked to have the back of the scarf left a little longer to insure it didn't leave a gap for the wind to blow down the back of his shirts. Which is really a good idea, come to think of it. I cut open the fabric at the side seam (see the dotted line), wrapped it around Son's neck, and determined the place to cut the keyhole slot, and then cut that out, too.


I blanket stitched around the cut edges to match the blanket stitching on the hat. I did that while watching tv, and it didn't take long at all.


Here's Son, wearing the scarf.


And a view of what it looks like in the back:


It will even keep faithful old dogs warm!


This was my favorite part of refashioning this old sweater, and even Husband wants one. I'll have to go back to the thrift store for more old wool sweaters!

Rose Hip Cookies with Tea


As you probably know, there are lots of foods that grow wild in Alaska. Probably the happiest find in the "wild foods" department for us has been rose hips. In my (ahem) former life as an urban housewife, roses were dead-headed when the blossoms faded, so there were no rose hips to speak of, but now I'll never dead-head another rose bush. The hips are too tasty and too versatile to waste.

While I haven't yet made the ever-popular rose hip jelly, I've made my fair share of rose hip tea and cookies. For tea, dry the rose hips whole for a couple of weeks until they're hard and wrinkly. Grind a tablespoon of the dried hips in your coffee or spice grinder, and then steep them in hot water for 5 minutes or more. Strain out the solids and enjoy the fruity-tasting hot tea with a little honey if you like.

Son's preferred use for rose hips is in rose hip cookies. Much like an old-fashioned cake-y gingerbread, they're lovely for dunking in coffee or tea. The recipe I use comes from the book "Collecting and Using Alaska's Wild Berries and Other Wild Products" published by the University of Alaska Fairbanks' Cooperative Extension Service. That is an excellent publication, by the way, and you can order it by clicking on the book title above. The illustrations in the book are covered by copyright, but the recipes do not appear to be. And so, here it is:

Rose Hip Cookies

2 1/2 cups flour
4 teaspoons baking powder
1/2 teaspoon cinnamon
1/2 teaspoon nutmeg
1/4 teaspoon ginger
1/2 teaspoon salt
1 1/4 cups brown sugar
1/2 cup shortening
2 eggs
1 1/2 cups rose hip puree*
1 teaspoon lemon juice
1 cup raisins, optional
1 cup nuts, optional

Sift together the dry ingredients. Set aside. Cream the sugar and shortening, add the eggs, rose hip puree, and lemon juice, and mix thoroughly. Add dry ingredients, raisins, and nuts, and mix well. Drop by tablespoonfuls onto a lightly oiled cookie sheet (I use parchment paper on the cookie sheet and skip the oiling). Bake 15 minutes at 400 degrees. Remove from cookie sheet and cool on wire rack.

I drizzled this batch with some melted white chocolate for a little bit of a change, but you don't have to. They're delicious the way they are.

* To make rose hip puree, combine 4 cups cleaned, soft, ripe rose hips with 2 cups of water. Bring to a boil and simmer for 15 minutes. Press through a sieve to remove seeds and skins. What does not go through the sieve can be simmered again by adding a little water to it. Press through the sieve again, and repeat the process until most of the fruit has gone through the sieve. Discard the seeds and skins. I freeze the puree in one and a half cup portions so whenever I want to make the cookies, all I need to do is thaw it and I'm ready to go.

Pictured are rose hip cookies and rose hip tea in a cup and saucer from Grandma A's collection.


November 21, 2009

The Eddie Bauer sweater refashion, part 1

I found this slightly-felted Eddie Bauer sweater at my local Salvation Army store. It's 85% wool and 15% nylon. Nice and thick, and only $4.75. I think I can make something new out of this...


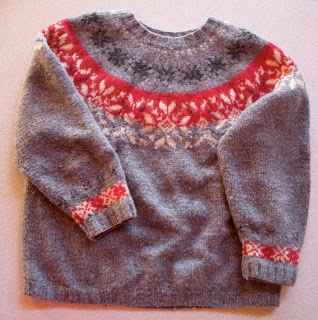
Son likes gray for his winter outerwear this year, so I thought he'd appreciate a refashion from this sweater until I can get around to knitting him something special. After consulting him and giving it some thought, I think I can get a complete set of hat, scarf and mittens from this one sweater. He said he'd like the hat first.

I threw this sweater (along with some others I bought at Salvation Army), into a washer load of towels, washed it in hot water and then threw it in the dryer so that it could felt up even further than it was when I bought it. It originally measured 23" long and 20" wide, and shrank down to 21" long and 18" wide. It got thicker and sturdier, especially where the red band has extra yarn in the fabric.

That red band with the snowflakes on it was just too pretty to waste, so I decided to make the hat in such a way as to preserve it. I've seen lots of refashions where hats were made from sleeves or from bottoms of sweaters, but I haven't seen one yet where the hat was made from the neckline. So I'm going out a little on a limb here and we'll see where it leads me. First, I had Son try on the sweater upside down, as if the neck ribbing were hat ribbing, to see if I could keep that ribbing on. Nope. Too small by about an inch, so I cut it off, leaving as much fabric at the neckline as I could, just in case I needed it. I can trim it off later if I want to, since the felted fabric won't unravel.


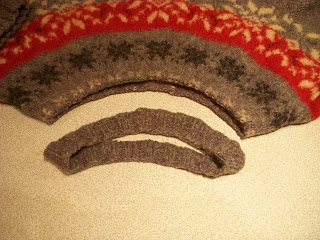
I measured Son's head from front to back, and from the bottom of his ear to the top of his head. Using those measurements as a starting point, I cut out an oversized semi-circle from the sweater (making sure to line up the pattern on both layers), cutting through the front and back at the same time. I now have two pieces of sweater. I got carried away and cut waaaay too big a semi-circle, so I trimmed it a bit. Son and Husband are both, shall we say, cranially endowed. I had to leave enough fabric so that I could cut some off if need be, rather than wish I had more.


I pinned the layers together, wrong sides facing, and making sure that the pattern was lined up.


Then I had Son test-fit it. Basted it together, had him test-fit it again, and basted it again until I had it just the way he wanted it. During this time we discovered that not only was this going to be a really warm wool hat, but it would cover his ears, too! Brownie points to me for deciding to use the neckline, huh?

This is what it looks like finally sewn together. I also sewed a small seam going from front to back at the crown of the hat, to help it conform to Son's head.


All that remains is to blanket stitch the border of the hat to make it look more finished. While I was doing that, Son and Husband went out to chop wood for the stove. I looked out the window and noticed that Son was bare-headed. Can't have that. So I took him the hat as it was, and he wore it for the first time before it was even complete.


Here's an action shot. By the way, I made Husband's hat, too. His is a wool-blend double-knit that took me something like three weeks to finish!


And here's what the hat looks like with the blanket stitching and the flap ties. Not that Son ever intends to actually tie the flaps down, so they're short and purely decorative.


Here's Son on our balcony, overlooking our snowy lake, holding his puppy and wondering when I'm going to get around to making the rest of his refashion outfit!


What would I do differently next time? I'd leave the back a little longer than the front, but since I'm about to make a scarf out of the same sweater fabric, I won't stress over that. I'll just change that little detail for next time!

See also: The Eddie Bauer Sweater Refashion, Part 2 and The Eddie Bauer Sweater Refashion, Part 3.

November 19, 2009

Knitted Dishcloths and Washcloths


The Mt. Redoubt Homemakers' Club is taking part in the annual holiday bazaar the weekend following Thanksgiving, and we have already run out of dishcloths, so I volunteered to make some more. Some of the projects I work on take days or weeks to finish, but dishcloths are deliciously quick and easy. It feels so good to be able to make several in an evening!

Everyone has their own pattern for knitted dishcloths, but I'll give you mine. It's the one my husband's grandmother used for the hundreds of dishcloths she made for everyone through the years.

For two dishcloths, you'll need one ball of 100% cotton yarn (such as Lily's Sugar and Cream) and size 8 needles. Using a long tail cast-on, cast on 4 stitches.

Knit two, yarn over (making an increase), and knit the remaining stitches on the needle.

Repeat this row (making one yarn-over increase per row) until you have 40 stitches on your needle.

Now begin decreasing:
(Knit two stitches together) twice, yarn over, and knit the remaining stitches on the needle.

Repeat this row until you have four stitches on your needle again, and bind off. Weave in ends.

I've seen patterns where the knitters prefer to start with 5 stitches, prefer different sized needles, etc. There's no wrong way. It's not a grand piano, it's something to wash your dishes with, so any and all variations are perfectly fine. In fact, the dishcloth in the photo is a variation of my usual pattern - I only have one stitch, not two, on the outside edge of the yarn-overs. And I think I might like it better that way.

The photo shows an assortment of dishcloths on their way to the holiday bazaar, a bar of my own homemade soap, and a Kraft Cheese Brick box that's been in my family so long I don't remember ever not having it.

November 13, 2009

Hello, and Welcome!

Greetings, fellow crafters! I'm glad to have you tagging along as I indulge my crafting obsessions, and I hope you'll decide to do a few of these projects with me. So get out your craft supplies and see what you have in your stash, because whatever it is you've been hoarding, I'm sure I'll get around to using it eventually!